
Plant Problems › Yellow Leaves
Yellow leaves are a symptom, not a diagnosis. This guide helps you tell normal aging from the problems that most often cause yellowing, check which one fits your plant, and fix it safely.
University of Maryland Extension describes leaf yellowing as often one of the first signs of plant stress. In houseplants, the cause is often in the growing conditions, such as water, light, nutrients or temperature, even when it looks like a pest or disease. University of Maryland Extension calls overwatering the number one reason indoor plants fail, so the soil and roots are the first places to look.
Quick answer
Common causes to check, starting with overwatering:
- Overwatering: lower and inner leaves turn yellow while the soil stays wet. Fix this week
- Natural aging: one or two of the oldest, lowest leaves turn yellow, and new growth looks healthy. Often normal
- Underwatering: yellowing comes with drooping, and the pot feels light and dry. Fix this week
- Light or nutrient problems: the whole plant looks pale, or new leaves turn yellow while their veins stay green. Fix this week
Other causes: pests such as spider mites, cold drafts, and the stress of a recent move.
Labels show how quickly to act if a cause is confirmed. They are not a diagnosis; check the signs in each section first.
Match what you see
Compare your plant with these signs, then jump to the matching section.
What you see: Lower and inner leaves yellow; the soil is still wet days after watering.
Likely cause: Overwatering
Fix this week
What you see: Yellowing and wilting even though the soil is wet; roots are dark and soft.
Likely cause: Root rot
Act soon
What you see: One or two of the oldest, lowest leaves yellow; new leaves look healthy.
Likely cause: Natural aging
Often normal
What you see: Drooping, yellowing lower leaves; the pot is light and the soil has shrunk from the sides.
Likely cause: Underwatering
Fix this week
What you see: A pale, light-green plant that stretches or leans toward the window.
Likely cause: Too little light
Fix this week
What you see: Pale, bleached or faded patches on the side facing the sun.
Likely cause: Too much direct sun
Fix this week
What you see: Fine yellow speckles, webbing, cottony clusters or sticky leaves.
Likely cause: Pests
Act soon
What you see: Dark, wilted or discolored leaves after a cold window, door or car ride.
Likely cause: Cold damage
Act soon
Find the cause in five checks
Work through these in order. Each one rules some causes in or out.
- Look at where the yellow is. Old lower leaves, new top leaves and the whole plant point to different causes (see the table below).
- Check the soil. Push a finger an inch or two into the potting mix, or lift the pot: a light pot is dry, a heavy one still holds water. In a large pot, slide a wooden dowel to the bottom; moist soil sticks to it or darkens it. What counts as dry enough depends on the plant: University of Maryland Extension notes that this finger test works for most houseplants, but succulents and cacti need far less water.
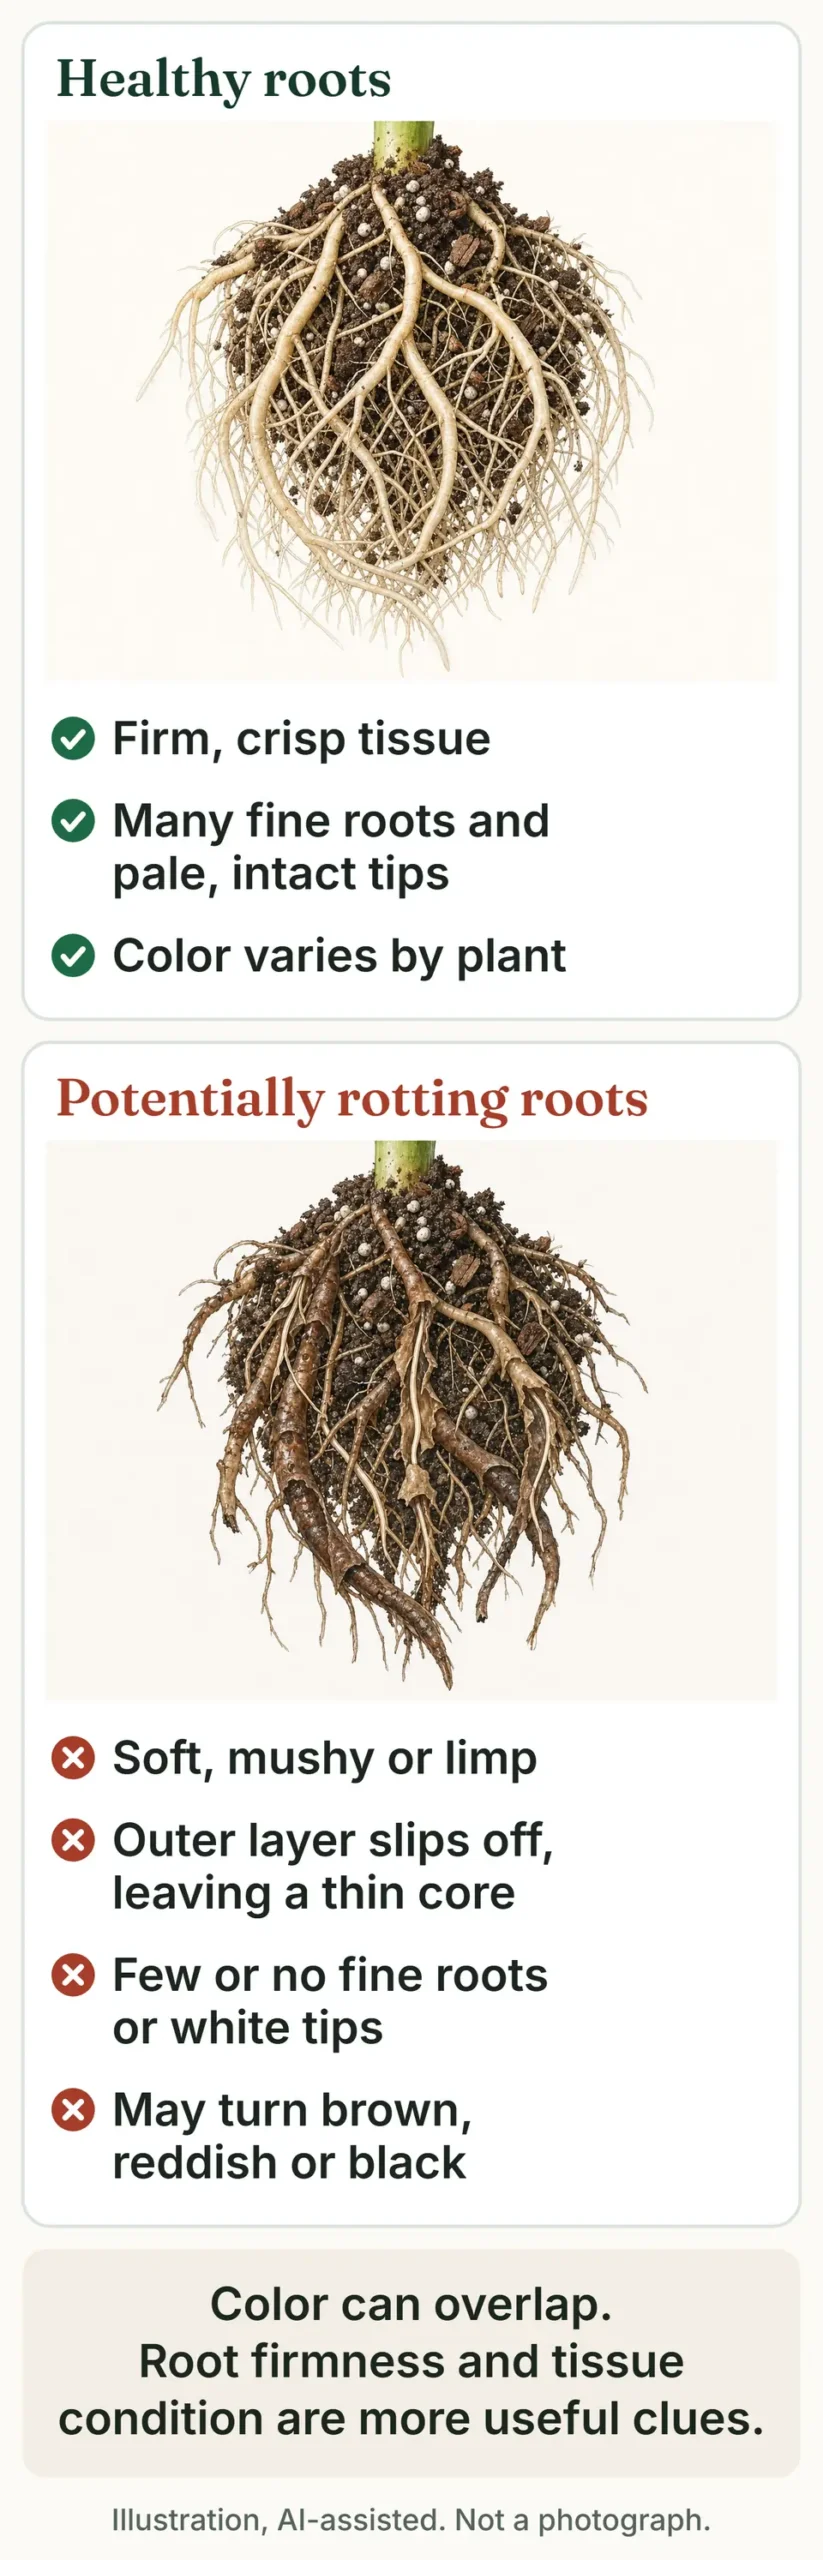
- Look at the roots. Ease the plant out of its pot, and feel the roots as well as looking at them. University of Maryland Extension says healthy roots should be light-colored and firm, while diseased roots look dark and soft. Color alone is not a reliable guide, because the shades overlap: Iowa State Extension describes rotted roots as brown or reddish, so a brownish root may be rotting rather than simply dry. Firmness tells you more than color. Treat the roots as one clue alongside the soil and the leaves, not as proof of a cause.
- Inspect the leaves up close. In good light, check the undersides and the joints where leaves meet the stem for tiny pests, fine speckling, webbing, cottony clusters or sticky residue.
- Think back over the last few weeks. Was the plant moved, brought indoors, placed near a cold window or a heating vent, fed, or left standing in a saucer of water?
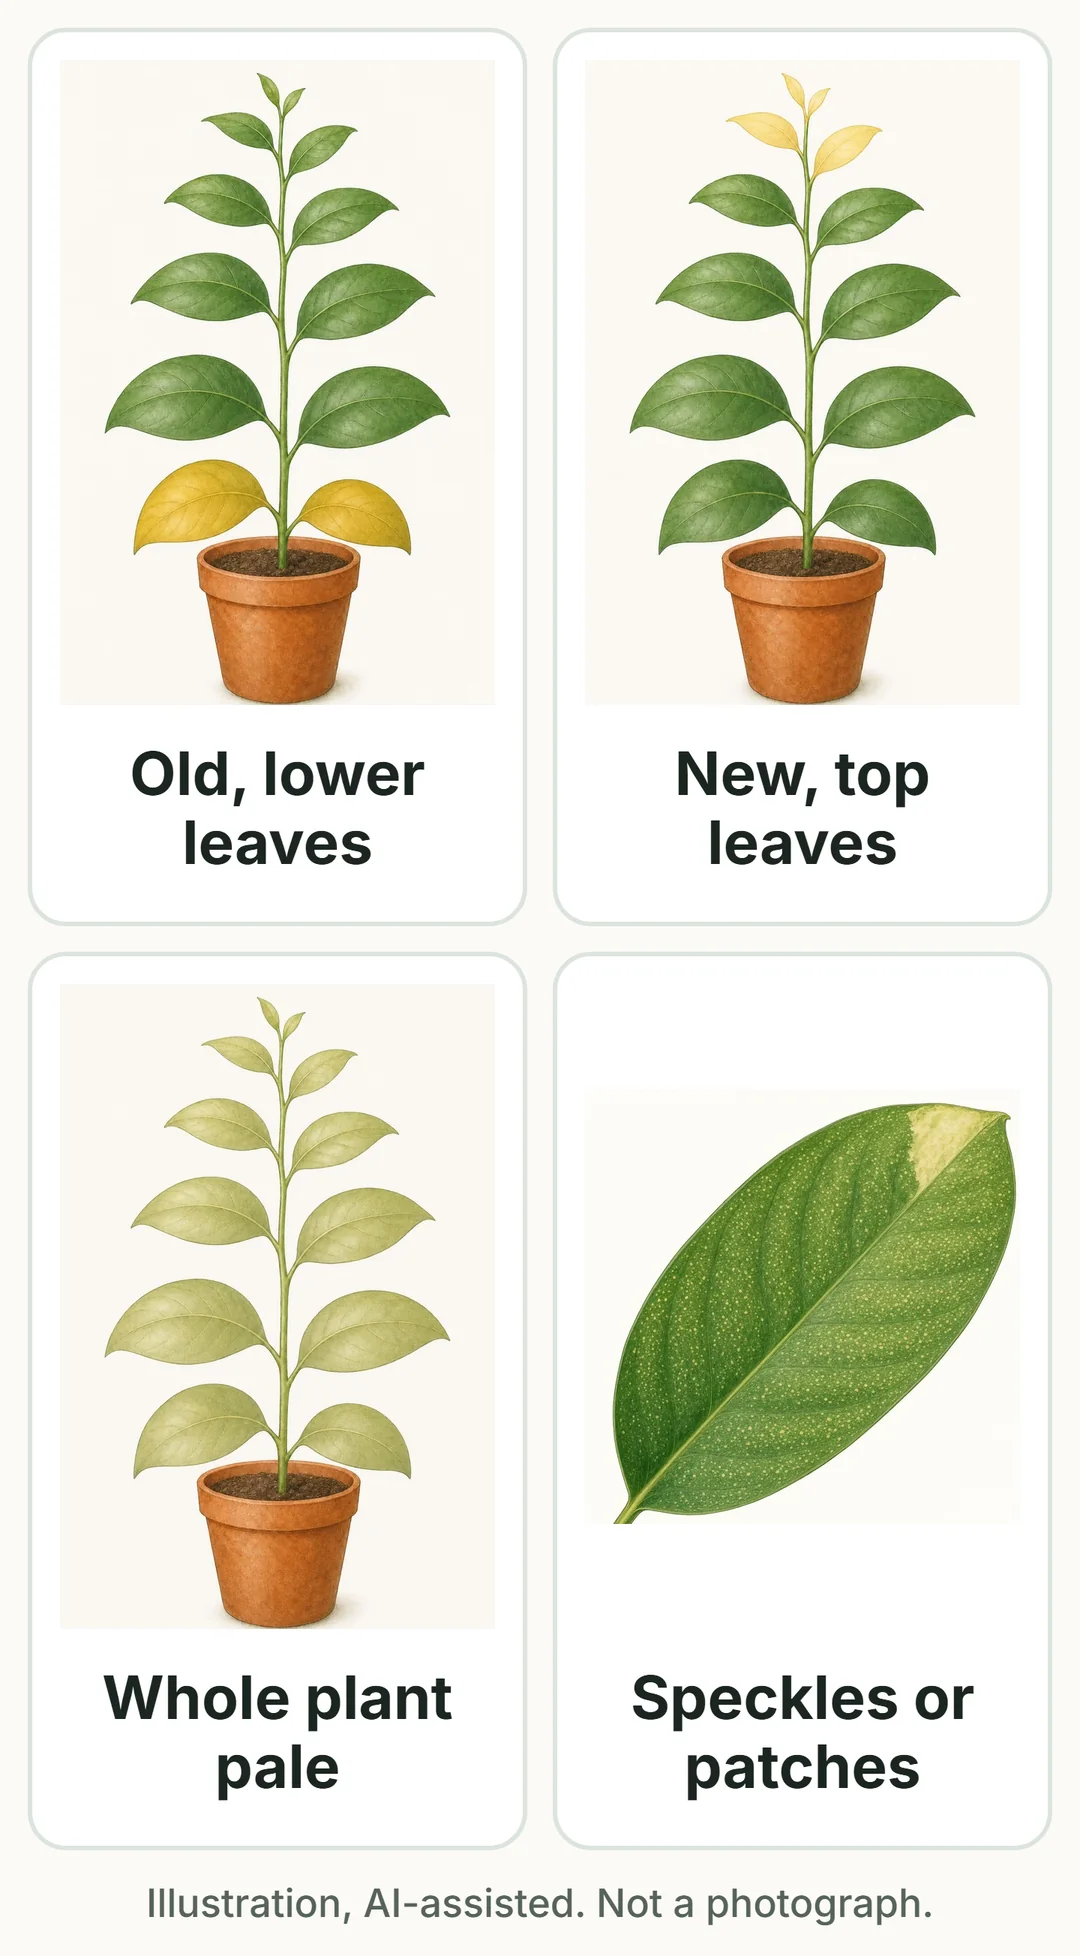
| Where the yellow is | Possible causes |
|---|---|
| Oldest, lowest leaves | Natural aging, overwatering, root rot, a shortage of nitrogen (or magnesium or potassium), pot-bound roots |
| Newest leaves | Low light, a shortage of iron, too much fertilizer |
| Whole plant pale or yellow | Light that is too low or too intense, low fertility, high temperature, pot-bound roots, overwatering, pests |
| Speckles, flecks or patches | Spider mites or thrips, sunburn, leaf-spot diseases |
Overwatering and root rot
How urgent: Fix this week Act sooner if the roots are dark and soft: Act soon
University of Maryland Extension calls overwatering the number one reason indoor plants fail, and Clemson Extension says yellowing of the entire plant is most often a symptom of it. Too much water pushes oxygen out of the potting mix, which damages the fine roots, so the plant can no longer take up water. That is why an overwatered plant can wilt even though its soil is wet. If the soil stays wet, root rot can follow.
How to tell
- The lower and inner leaves turn yellow first, and the plant may wilt.
- The soil is still damp an inch or two down several days after watering, or the pot stands in a saucer or decorative pot full of water.
- The pot has no drainage hole, or the mix at the bottom stays soggy and smells bad.
- The roots are dark and soft instead of light-colored and firm, or the base of the stem has turned dark or mushy. These are signs of possible root rot.
- Fungus gnats around the pot are another sign that the mix stays too wet.
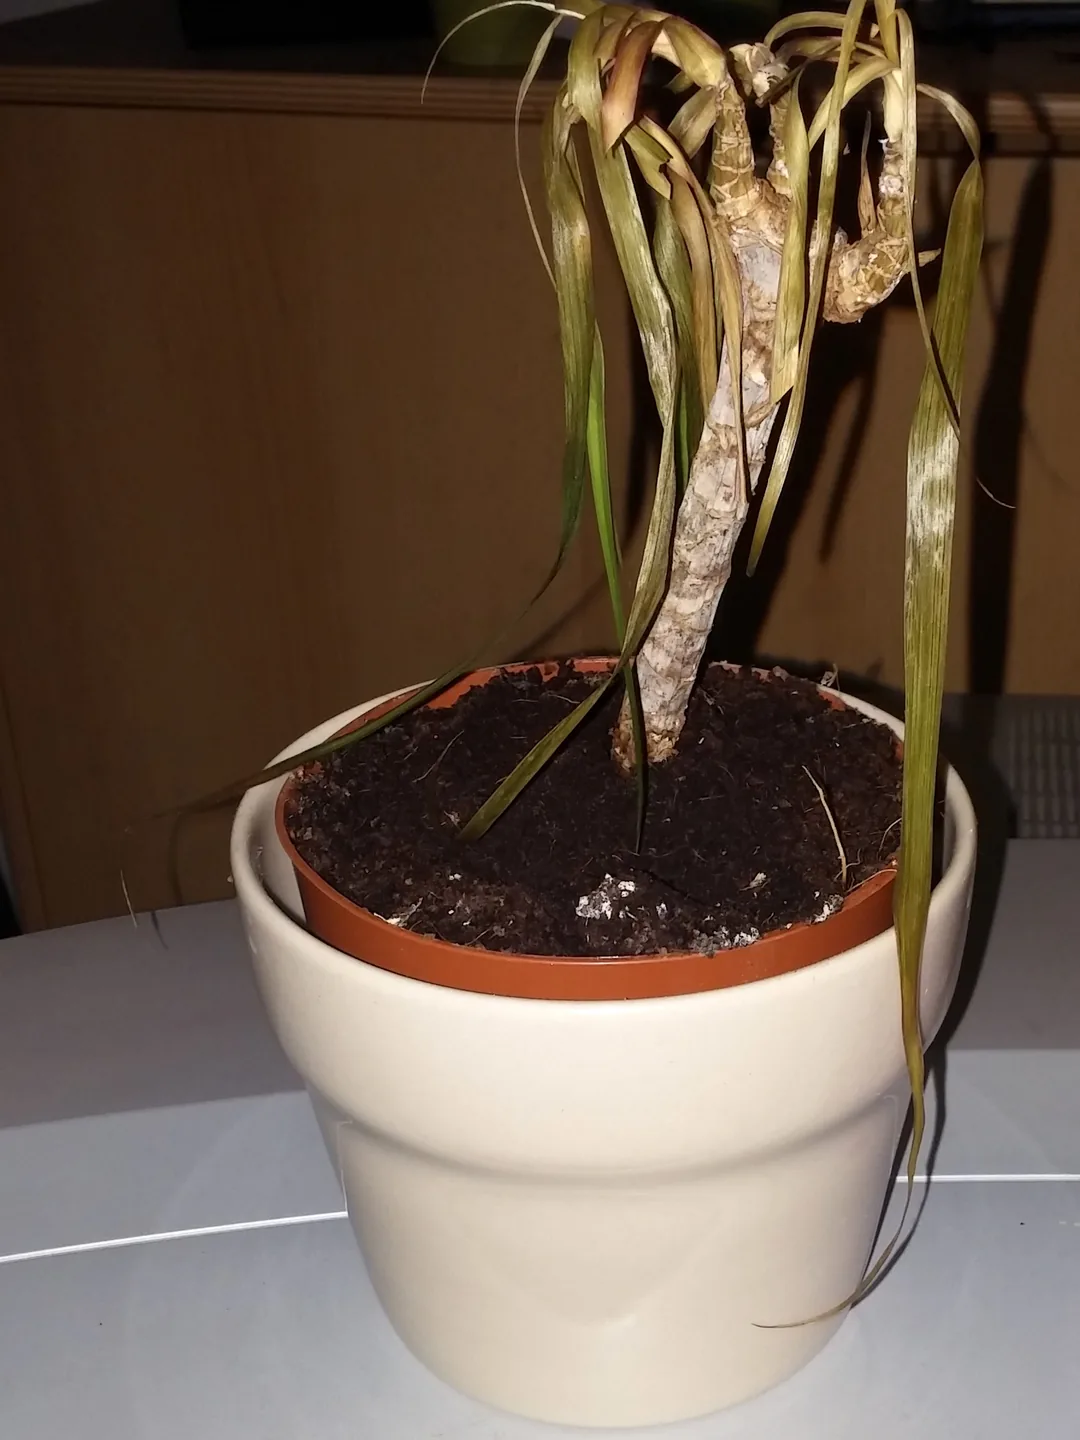
Photo: Scot Nelson, CC0, via Flickr (cropped and resized)
How to fix
- Stop watering, and pour off any water standing in the saucer or decorative pot.
- If the pot has no drainage hole, repot into one that does, using fresh, well-drained potting mix labeled for houseplants.
- Check the roots. If some are dark and soft, root rot may have started. University of Maryland Extension advises cutting out the rotten parts and replanting the healthy sections.
- If most of the roots are dark and soft, the plant may not recover, and University of Maryland Extension advises discarding severely damaged plants. If your plant is a kind that grows from stem cuttings, first take cuttings from healthy stems and root them in sterile potting mix.
- Let the potting mix dry before you water again; how far depends on the plant (see the soil check above). If the roots you checked were firm, Illinois Extension suggests waiting about two weeks before feeding with a water-soluble houseplant fertilizer, and repotting in fresh soil if there is no improvement two weeks after that.
Prevent it
Check the soil before every watering instead of watering on a fixed schedule; University of Maryland Extension warns that many people wrongly assume once a week is the right interval. How fast a pot dries depends on the potting mix, the type of pot, the plant’s stage of growth, humidity and temperature. Use pots with drainage holes, choose a pot that is not much bigger than the root ball, and never leave a plant standing in water.
Natural aging of older leaves
How urgent: Often normal
Leaves do not last forever. Penn State Extension lists natural aging among the reasons old leaves turn yellow, so an occasional yellow leaf at the bottom of an otherwise healthy plant is usually nothing to worry about.
How to tell
- Only one or two leaves turn yellow at a time.
- They are the oldest leaves, at the bottom or on the inside of the plant.
- New leaves have a healthy color, and the plant keeps growing.
- The soil, light and roots pass the checks above.
How to fix
- Nothing urgent is needed. Once a leaf is fully yellow, snip it off at its base with clean scissors, or wait until it comes away with a gentle tug.
- Watch the pace. If many leaves turn yellow at once, or the yellowing moves up the plant or reaches new leaves, go back to the five checks.
Prevent it
You cannot prevent normal aging. Noting roughly how often it happens helps you spot a change early. If many old leaves turn yellow at once, look at watering, root rot, pot-bound roots and nitrogen instead.
Underwatering
How urgent: Fix this week
Missouri Botanical Garden notes that decline from being kept too dry is very common. Clemson Extension adds that lower leaves may turn yellow and die when a plant stays too dry for an extended time.
How to tell
- The plant droops, and the lower leaves turn yellow, often with dry brown tips or edges.
- The pot feels light when you lift it, and the soil is dry well below the surface.
- The potting mix has shrunk and left a gap around the inside of the pot.
- Roots circle the pot and fill it. University of Maryland Extension notes that pot-bound plants often show signs of drought, because water runs through too fast and the center of the root ball stays dry.
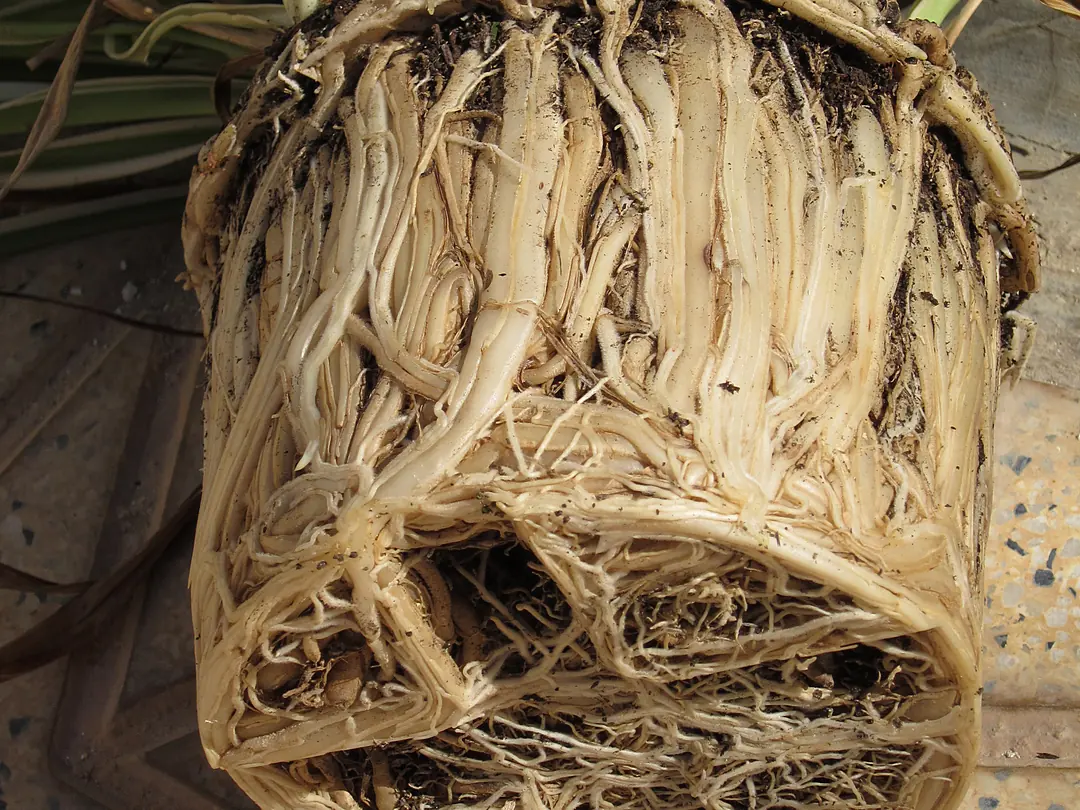
Photo: Keith Williamson, CC BY 2.0, via Flickr (cropped and resized)
How to fix
- Water thoroughly until water runs out of the drainage hole, then let it drain.
- If the mix has pulled away from the pot, water slowly several times, or stand the pot halfway deep in a sink or bucket of lukewarm water for an hour or two so the mix can soak up water again. Let it drain fully afterward.
- If roots fill the pot, repot into a slightly larger pot and loosen the outer roots by hand so they can spread. Iowa State Extension advises against a container that is too big, which can lead to overwatering.
Prevent it
Check the soil regularly by lifting the pot or feeling the mix, rather than waiting for the plant to droop. A plant that stays dry for a long time may not fully recover even after watering, so do not let it get to that point.
Light: too little or too much
How urgent: Fix this week
Light drives growth, and both too little and too much can change leaf color. Penn State Extension lists light that is too intense or insufficient among the causes of yellowing across the whole plant, and low light among the causes of yellowing on young leaves.
How to tell
- Too little light: the plant looks pale or light green, stems stretch with long gaps between leaves, and it leans toward the window. Some plants also drop older leaves. This is common in winter and after a plant has spent the summer outdoors.
- Too much direct sun: pale, bleached or faded patches appear, mainly on the leaves facing the window, and later turn brown and brittle. Damage is worse when strong sun meets dry soil.
How to fix
- If the plant is too dark, move it closer to a bright window or add a grow light. In the US, a south-facing window usually gives the most light. How much light is enough depends on the plant, so check what your species needs first.
- If the plant is getting scorched, move it back from the direct sun. Remove leaves that are badly damaged.
- Change the light gradually. Plants used to low light can scorch if moved straight into strong sun; University of Maryland Extension suggests starting with about two hours of full sun a day when moving plants outdoors and increasing it slowly.
Prevent it
Check whether your plant needs low, medium or high light before choosing its spot. If you use a grow light, give the plant some darkness each day: no more than 16 hours of light.
Nutrient problems: too little or too much fertilizer
How urgent: Fix this week
Illinois Extension notes that yellowing can also mean a plant needs fertilizer, but that reaching for fertilizer is not an appropriate first response. Too much of it does harm: Iowa State Extension notes that salts from excess fertilizer can damage roots, and Penn State Extension lists overfertilization among the causes of yellowing young leaves. Where the yellow shows up is the best clue.
How to tell
- Nitrogen shortage: the oldest leaves turn yellow while new growth stays green. Sources describe the pattern differently: Missouri Botanical Garden says the yellow starts at the leaf margins and moves inward, while UC IPM, writing about home and landscape plants, describes older leaves turning uniformly pale green to yellowish and links yellow margins to a potassium shortage. In severe cases, only the new growth stays green (Missouri Botanical Garden).
- New leaves yellow with green veins (interveinal chlorosis): often linked to iron, which University of Maryland Extension calls the most common nutrient deficiency in indoor plants; acid-loving plants such as gardenias are prone to it. The pattern does not prove the potting mix lacks iron. Illinois Extension lists poor drainage, damaged roots and a high pH among the causes of chlorosis: iron can be present but unavailable at a high pH, or not absorbed by injured roots. Shortages of other nutrients, such as manganese or zinc, also cause chlorosis.
- Too much fertilizer: a white crust on the soil surface, the pot rim or a clay pot, yellow or brown leaf tips and edges, wilting, or leaf drop.
- Pot-bound roots: a plant that has filled its pot for a long time may run short of nutrients. Clemson Extension notes that pot-bound plants are especially prone to yellowing lower leaves.
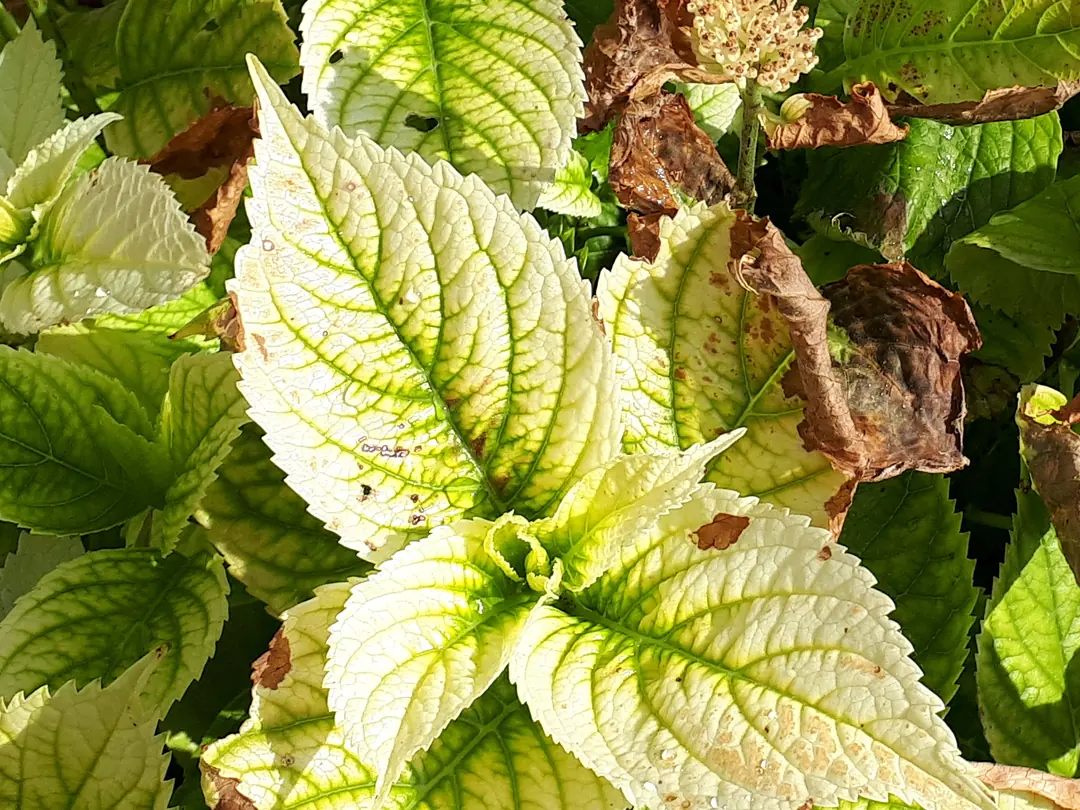
Photo: Pierre.hamelin, CC BY-SA 4.0, via Wikimedia Commons (cropped and resized)
How to fix
- Rule out watering problems first. An overwatered plant should dry out before you feed it, because fertilizer cannot fix damaged roots.
- For yellowing on old leaves of a plant that has not been fed in a long time, use a water-soluble houseplant fertilizer while the plant is actively growing. Iowa State Extension notes that most fertilizers are made for outdoor growing and recommends half or quarter strength indoors. Needs vary by plant, so check the label and your plant’s own requirements.
- For new leaves that are yellow with green veins, find the underlying cause before adding iron. Illinois Extension notes that treatment for chlorosis varies with the cause, so check drainage and roots first, since poor drainage and injured roots are among the causes it lists. If the roots are healthy, the light suits the plant and the pattern continues, a chelated iron product labeled for houseplants, used according to the label, is the remedy University of Maryland Extension suggests for iron chlorosis. If the yellowing still spreads, your local Extension office can help identify the cause.
- For a salt crust or suspected overfeeding, flush the pot: run plain water through it several times until it drains freely. Then feed less often, at half or a quarter of the label strength. If the buildup is heavy, repot in fresh mix.
- If roots fill the pot, repot into a slightly larger container with fresh potting mix.
Prevent it
Feed only while the plant is actively growing, not at every watering, and adjust to the plant: University of Maryland Extension advises cutting back on fertilizer in winter. Leaching the pot with clear water every four to six months, which University of Maryland Extension also recommends, keeps fertilizer salts from building up.
Pests
How urgent: Act soon
Several sap-feeding pests can turn leaves yellow, including spider mites, scale, whiteflies, mealybugs and aphids. They are easy to miss, so look closely, especially under the leaves. Iowa State Extension advises dealing with each of these pests right away, before populations become unmanageable.
How to tell
- Spider mites: fine yellow speckling, dirty-looking leaves and thin webbing. The mites are about the size of a grain of pepper.
- Scale: white, brown, gray or reddish bumps on stems and leaves that you can scrape off; leaves may turn yellow and drop, and leaves or the floor below may be sticky.
- Whiteflies: mottled yellow leaves, and tiny white insects that fly up in a cloud when you touch the plant.
- Mealybugs: white, cottony clusters on leaves, stems and in leaf joints.
- Aphids: small soft-bodied insects clustered on shoot tips and leaf undersides, often with twisted new growth and sticky residue.
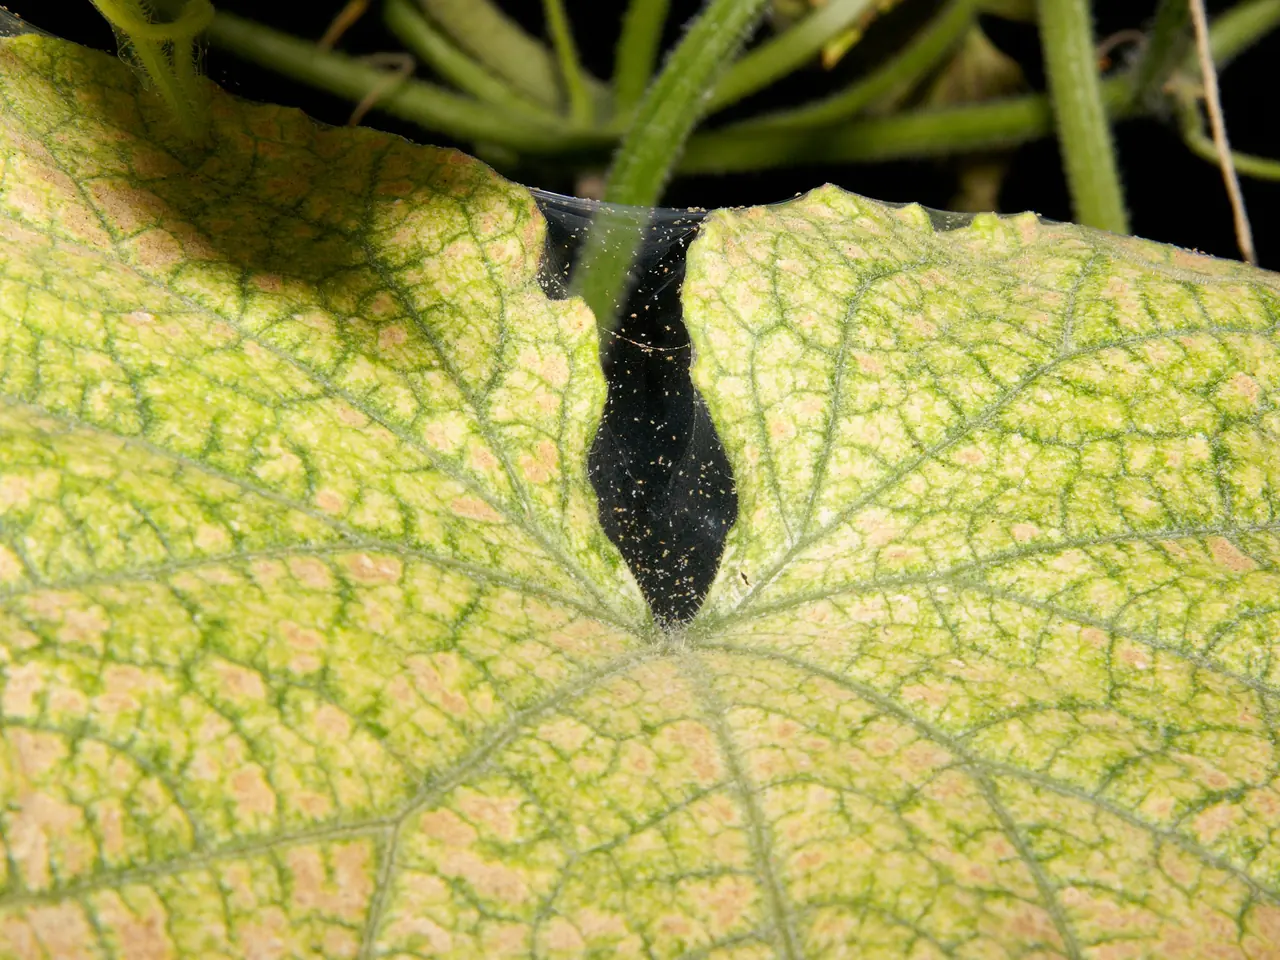
Photo: Olllli, CC BY-SA 3.0, via Wikimedia Commons (cropped and resized)
How to fix
- Keep the plant away from your other plants while you deal with the pests.
- Rinse the plant regularly with water to knock pests off. For a few mealybugs, dab each one with a cotton swab dipped in rubbing alcohol.
- For heavier infestations, use a spray registered for houseplants and follow its label exactly. Plants weakened by heavy insect or mite feeding can be injured by insecticidal sprays (University of Maryland Extension), and badly damaged plants are often better discarded.
- Check the plant again over the next few weeks, and repeat treatment only as the label allows.
Prevent it
Inspect new plants before putting them next to your others, and check plants that spent the summer outdoors before bringing them back inside.
Cold, drafts and moving stress
How urgent: Act soon after cold exposure; Often normal for a short adjustment after a move
Many houseplants are tropical or subtropical, and Missouri Botanical Garden notes that chilling temperatures can damage them even when it is not freezing. Heat matters too: hot air from heating vents and radiators adds stress. Plants also react to a change of place: Illinois Extension notes that many plants go through an adjustment period whenever they are moved.
How to tell
- Leaves darken, wilt, develop spots or drop after a cold night, an open door or window, contact with cold glass, or a cold car ride. Damage can keep appearing for up to a week after the exposure.
- A plant kept cool for a long time loses vigor, stops growing and turns yellow, especially in wet soil.
- Yellowing or leaf drop starts within a few weeks after the plant moved to a new spot or a new home, or came indoors after summer.
- The plant sits right next to a heating or cooling vent or a radiator.
How to fix
- Move the plant away from cold glass, drafty doors, and heating or cooling vents. University of Maryland Extension advises protecting houseplants from temperatures below 50°F.
- After cold damage, give the plant about a week for the damage to show fully, then remove the damaged leaves. If the damage is not severe, the plant can survive once the damaged leaves are removed.
- Do not keep the soil wet while the plant is cool; cold, wet soil often leads to root rot.
- After a move, keep care steady and give the plant time to adapt. If the yellowing continues for more than a few weeks, Illinois Extension suggests trying a different spot and adjusting the watering slightly.
Prevent it
Choose spots away from drafts and vents, and bring plants that summer outdoors back inside before nights drop below 50°F.
When to act quickly
- Dark, soft roots, a bad smell from the soil, or a mushy stem base: possible root rot. Check the roots today and cut away rotten parts; see overwatering and root rot.
- The plant was exposed to temperatures below 50°F: move it somewhere warmer now and keep the soil from staying wet; see cold, drafts and moving stress.
- Spider mites, scale, whiteflies, mealybugs or aphids on the plant: isolate it now so the pests do not spread to your other plants. Iowa State Extension advises isolating infested plants and dealing with these pests right away; see pests.
Yellow leaves by plant
Guides for yellow leaves on specific plants:
Frequently asked questions
Should I cut off yellow leaves?
Yes, once you have found the cause. Remove leaves that are fully yellow or brown at their base with clean scissors. Removing them does not fix the cause, but it keeps the plant tidy, and University of Maryland Extension notes that gray mold frequently infects older, lower foliage. Judge recovery by the new leaves, not the yellow ones.
Should I fertilize a plant with yellow leaves?
Not as a first step. Overwatering is a frequent cause, and fertilizer cannot help damaged roots; too much fertilizer can cause yellowing itself. Feed only once the soil, roots and light check out, the plant is actively growing, and the pattern fits a nutrient shortage.
Why do my plant’s leaves turn yellow in winter?
Often because of watering. In its advice on winter problems, University of Maryland Extension says the number one reason for dying plants is usually overwatering, and advises letting most of the mix dry out while most plants grow more slowly in winter. For most houseplants, that means a mix like a wrung-out dish towel: not bone dry, but not soggy. Succulents and cacti need even less water. Missouri Botanical Garden adds that less light, lower humidity and hot air from indoor heating make leaf drop likely when plants come back indoors after a summer outside.
Why are the leaves on my new plant turning yellow?
Often because it is adjusting to its new home. Many plants go through an adjustment period after a move, and some yellowing or leaf drop is a common first reaction. Check that the nursery pot can drain and is not standing in water inside a decorative pot, give the plant suitable light, and keep its care steady.
Are yellow spots on leaves the same problem?
Not usually. Spots point to different causes than evenly yellow leaves. Fine yellow speckles often come from spider mites or thrips. Spots with a yellow halo or yellowish margin can be bacterial or fungal leaf spot. An irregular yellow-and-green mottle has several possible causes, including sap-feeding pests, nutrient stress and plant viruses. University of Illinois Extension notes that virus symptoms on ornamental plants are often confused with nutrient and environmental stress, and recommends a lab test if you suspect one. Check for pests and work through the five checks first. If no other cause fits, your local Extension office can tell you whether testing is worthwhile. Infected plants cannot be cured, so keep a suspect plant away from your others in the meantime.
Not sure which cause fits? Go back to the five checks and work through them in order.
Sources
- University of Maryland Extension: Yellowing Leaves on Indoor Plants; Overwatered Indoor Plants; Winter Indoor Plant Problems; Pot-Bound Indoor Plants; Nutrient Deficiency of Indoor Plants; Low Light Impacts on Indoor Plants; Excess Light on Indoor Plants; Diagnose Indoor Plant Problems; Watering Indoor Plants.
- Clemson Cooperative Extension, Home & Garden Information Center: Houseplant Diseases & Disorders (HGIC 2251).
- Iowa State University Extension and Outreach: Diagnosing Houseplant Problems Related to Poor Culture; Root Rots of Houseplants; Diagnosing Houseplant Problems Caused by Insect Pests.
- University of Illinois Extension: Keep houseplants happy with simple solutions; Chlorosis; Viral Diseases of Plants (Home, Yard and Garden Pest Newsletter).
- Penn State Extension: Diagnosing Poor Plant Health.
- Missouri Botanical Garden: Problems Common to Many Indoor Plants.
- UC Statewide IPM Program (University of California): Common Nutrient Deficiency Symptoms (home and landscape plants).


